The iPhone lineup always has impressive cameras. They have become the go-to choice for many people to take pictures. However, photos and videos can easily become a drain on your iOS storage space over time and use. In this case, transferring photos from iPhone to USB flash drive is a good idea.
You get a backup for your photos and memories. Moreover, you can free up storage space on your phone. Are you wondering how to transfer photos from iPhone to flash drive? Although Apple doesn’t provide a direct method, this article has some workarounds.
Easiest Way to Transfer Photos from iPhone to Flash Drive
Since there are various limits with iCloud, iTunes, or other built-in apps, which we’ll talk about later, the easiest way to transfer photos from iPhone to Flash Drive is to use an iOS backup and transfer tool.
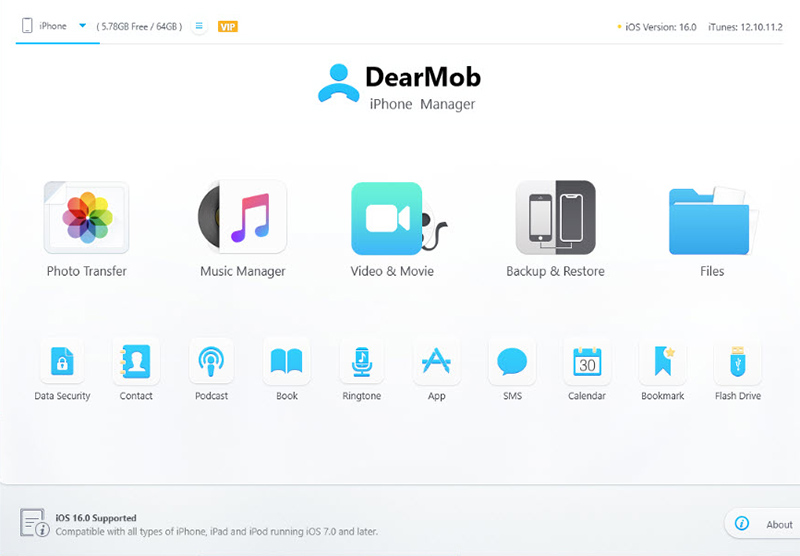
DearMob iPhone Manager is a powerful yet easy-to-use iPhone management software. It can transfer any or all of your photos according to your needs while retaining the album structure. You can browse your photos within DearMob as on your iPhone. It excels at bulk and mass transfer with an average of 0.08 seconds for a 4K UHD picture.
Better yet, it’s fully compatible with HEIC, Live, ProRAW, geotagged photos, etc. In addition to photos, you can also transfer music, videos, contacts, app data, and more anywhere you want.
Here’s how to transfer photos from iPhone to flash drive using DearMob iPhone Manager.
Step 1. Download and install DearMob iPhone Manager.
Visit its official website and get the latest version. It’s 100% clean and safe. No virus, no adware, no malware, etc.
Step 2. Browse and select the photos in DearMob iPhone Manager.
Launch DearMob iPhone Manager. Unlock your phone and connect it to the computer using a cable. Tap Trust when you see the “Trust This Computer” prompt.
Go to the Photo Transfer module from the welcome screen. Browse and select the photos that you want to transfer. Click the Export button. The output folder will pop up when the transfer finishes.
Step 3. Transfer photos to the flash drive.
Now you can plug in the flash drive and transfer your photos. Please note that you can set your flash drive as the backup folder directly with DearMob iPhone Manager. But for data security, we recommend using the system hard disk as the default backup path.
How to Transfer Photos from iPhone to Flash Drive on Windows 10
Besides the third-party iPhone manager, you can use File Explorer on Windows 10 to transfer photos from iPhone to flash drive. When you connect your iPhone to your computer with a USB cable, File Explorer will recognize it as a portable device. Thus you can access your photos on the computer and then transfer them to a flash drive.
However, Windows will only display photos in your Camera Roll due to Apple’s limitations. And there’s no way for you to transfer photos from other folders.
Follow the steps below to transfer photos from iPhone to flash drive on Windows 10.
Step 1. Connect your iPhone to a Windows PC. Unlock your iPhone. Trust This Computer when the warning prompts.
Step 2. Plug in the flash drive.
Step 3. Go to This PC > your iPhone > Internal storage > DCIM to browse your photos.
Step 4. Copy to transfer the photos from iPhone to flash drive.
How to Transfer Photos from iPhone to USB Flash Drive Using Mac
Apple always does a good job in device interoperability. If you are running a macOS device, you can use the Photos app to transfer your photos. The built-in Photos app offers the features to organize and edit your photos, create albums, etc.
But please note that the Photos app can only transfer photo files in the Camera Roll. It can’t do anything about photos stored elsewhere.
Follow the steps below on how to transfer photos from iPhone to flash drive with the Photos app on Mac.
Step 1. Connect your iPhone and the flash drive to your Mac.
Step 2. The Photos app shall open automatically. If not, open it manually in Finder.
Step 3. Select the photos you want to transfer. Then click the Import button.
Step 4. Transfer the photos to your flash drive.
Transfer Photos from iPhone to Flash Drive without Computer
Besides using a cable adapter, Apple also offers a wireless way to transfer photos, iCloud. iCloud is a cloud service that allows you to back up and restore your photos, documents, and other data across all your Apple devices. It’s quite similar to using Google Drive and other cloud services.
Every user gets 5 GB of free storage when signing up for iCloud. Make sure there is still enough storage space to transfer photos.
Step 1. Go to Settings > iCloud > Photo on your phone. And turn on the iCloud Photo button.
Step 2. Your photos will start uploading to your iCloud account when connected to WiFi.
Step 3. Open iCloud and log in to your account on your computer.
Step 4. Go to the Photos app and download the photos you want to transfer.
Step 5. Insert the flash drive and start transferring photos.
Best Flash Drive to Transfer Photos from iPhone
Yes, you can also use a flash drive with the lightning connector. These memory sticks can be plugged into your iPhone’s charging port. Thus you can directly transfer photos from iPhone to flash drive. Some of the best flash drives for iPhone include SanDisk iXpand Flash Drive Go and BLANBOK+ USB flash drive.
The whole transfer process is quite simple and straightforward. The only downside is that flash drives for iPhones can be a little on the pricier side – even pricier than a program that can backup and restore all your iPhone data. And they require the corresponding app to work properly.
The Bottom Line
So here are the five best methods to transfer photos from iPhone to flash drive. Overall, we think using a third-party iPhone manager is the best bet, considering the ease of use and price.
DearMob iPhone Manager offers an interesting free version. Other iPhone management apps usually offer very limited free trials for only a few days. With DearMob, you have 100 free credit points every day to transfer photos or any other iPhone data. Each photo file usually takes only 2-4 points. So theoretically, you can even use it for free all the time. If you are satisfied with its features, now you can grab the holiday offer. Get the best iPhone manager at the lowest price!


